Introduction
As promised at the Workplace Ninja Summit 2 weeks ago, here some details about how to integrate the Azure Web App to get secrets from the Key Vault. The idea to create this app started after reading and studying the available solution that is available online. The solution itself is well put together but I missed something. What if I don’t want to give my help desk agents access to the Azure, not to mention access to the Azure Key Vault to read secret key values. What if I want to control who can retrieve secret values? How to search for the right device in the Azure Key Vault? I tried to build different solutions with Power Apps. However, I was not satisfied in terms of security. This is how the idea of building this Azure Web App came up.
John Seerden released his SLAPS solution for the community in 2018. He managed to create an HTTP-based API, using the experimental PowerShell language support in a Function App, that contains all of the logics for returning random passwords on demand and simultaneously storing them securely into an Azure Key Vault. Passwords are contained in a variable and never exposed in plain text. More info: https://www.srdn.io/2018/09/serverless-laps-powered-by-microsoft-intune-azure-functions-and-azure-key-vault/
If you want to implement this solution, I can recommend you to read Tim’s blog where he recently updated the implementation steps. Due to the regular UI changes in Azure, the blog post of John was a little outdated. More info: https://www.cloud-boy.be/blog/serverless-laps-with-intune-function-app-and-key-vault/
This Web UI Service is an open-source community project free to adjust so that it fits your needs.
Me not being a developer, the next steps were a huge challenge but an amazing learning experience. Big Shout-out to Arya Ghodsi, for being super supportive and patient along this journey. I would have never been able to do this without his help! He also took the time to list the steps, to make it easy for you to integrate this in your environment.
Prerequisistes:
- App Service with Application Insights enabled.
- The application should have a managed identity.
- Azure Key Vault with an access policy that allows the managed identity from the App Service to read and list secrets.
- The ability to create an app registration in Azure AD.
- Have dotnet core ( >= version 3.1) tool available on the machine on which you are compiling the code.
- You should have access to the app service you created to upload packages.
Setup the App Service:
0. Create an App Service in Azure for a .Net core project


1. Enable Application Insights, this allows you to have an audit trail on who makes requests.

2. After the resource has been created, go to its page, and copy its URL because you will be needing it in the app registration step

3. Also make sure that this instance has its own managed identity. We use this identity to make calls to Azure Key Vault.

4. Copy the Object ID, this will help you later when assigning rights to this identity in Azure Key Vault.

5. Go to your Azure Key Vault that you want to give access to from the web UI and go to Access Policies and click “Add Access Policy”

6. In this page Get and List is the only ones that are needed.

7. Under selected Principal click “None Selected” and paste the object id that you copied in step 4 to find your application and select it.

- Don’t forget to save!
8. Also copy the name of your Azure Key Vault, you will be needing it later.
9. We also need to register the web UI in Azure AD. Navigate to Azure AD.

10. Go to App Registrations and click New Registration

11. When creating the app registration, in the redirect URI field, take your URI from step 2 and add /signin-oidc to it. So it looks something like:

12. Click Register
13. Go to the registration you just created and click Manifest and look for the value “groupMembershipClaims” and change its value to “SecurityGroup”

14. Go to Authentication and enable the ID Tokens under implicit grant

15. Save the manifest and navigate to Certificate and secrets of the same registration (on the same page) and create a new client secret by click on “New Client secret”

16. Give the secret a description and expiration time and copy its value. Once you leave this page, the password is not shown anymore, and you cannot reveal it afterwards.

17. On the overview page of your registration copy the client id

18. Also copy your tenant ID which is shown on the Azure AD main page as well as your primary domain

19. You will also need the object ID of a group in Azure AD. Only users in this group will be given access to the web application. So copy this value and keep it for the next steps.
20. Go to the Application Insights blade and choose the application insights instance that has been created from step 1

21. On the Overview page copy its Instrumentation key

22. Download ZIP from https://github.com/KenGoossens/slapsWebUIService or clone the repository using Git on the machine where you want to do the deployment. We are going to assume you used the ZIP.

23. Extract the ZIP to a location of your choice. Open the file appsettings.json and adjust the the values in yellow with the values you have copied from the previous steps:

24. For this step to work, you will need .Net Core (min version: 3.1) on your machine. If you do not have it, you can install it from here: https://dotnet.microsoft.com/download/dotnet-core/3.1
25. Open Powershell and navigate to the folder where the code is currently and run this command:
dotnet build

26. Publish the application by running the command
dotnet publish

27. This will publish your project to the last folder mentioned (\bin\Debug\netcoreapp3.1\publish). We will create a zip from this folder. Run the command below or zip it manually.
Compress-Archive -Path <PATH OF YOUR PUBLISHING FOLDER> -DestinationPath <file-name>.zip.
Make sure that you “zip the content of folder and not the parent folder itself”.
28. Navigate to https://<app_name>.scm.azurewebsites.net/ZipDeployUI (change the name to your web app service) and login with your credentials.

29. Upload the zip from step 23 by dragging and drop or clicking the + sign and adding the ZIP. You can follow the progress of the upload and deployment on the right

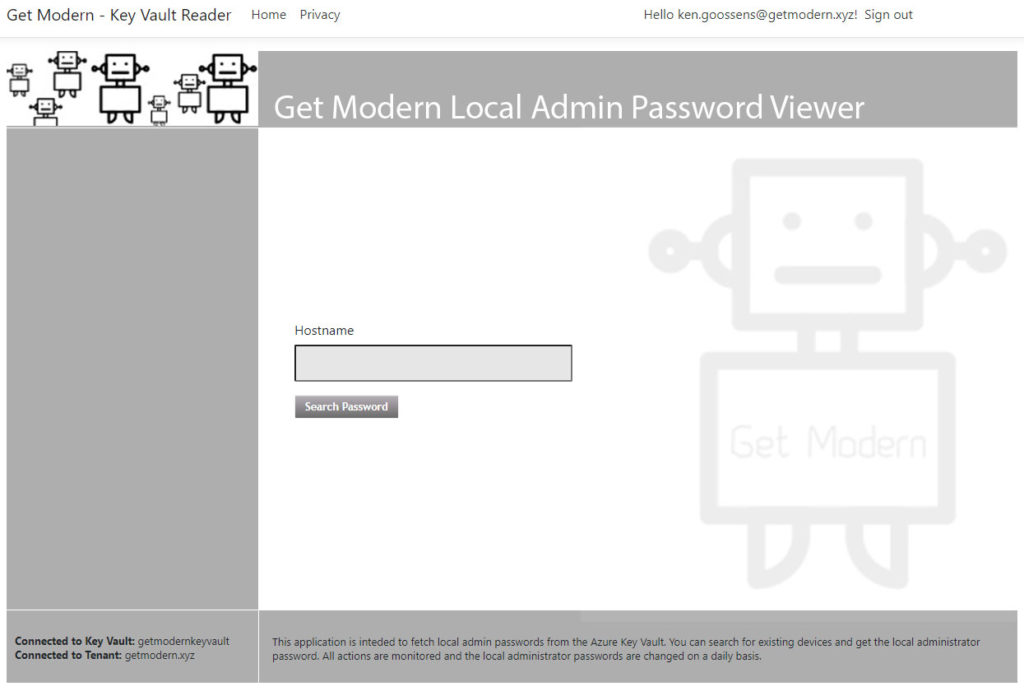
30. Once complete, you can go to the URL and get started. When you login, you will be asked to allow the web app to read your use profile

31. You should not be able to do queries against the Azure Key Vault

I hope that this will help you to implement it, so that you can have a look and feel.
Enjoy! See you next time.
2 Comments. Leave new
Hello Ken:
Good write up.
Have you also considered SYNERGIX SEVA ( Secrets Vault ) software ? The community edition allow for password rotation of one account, the built-in administrator account and it comes with an easy to use dashboard. Users don’t have direct access to any of the Azure Resources.
There is also Enterprise Edition with more bells and whistles
– Role Based Access Control
– Support for multiple local accounts
– Support for On Prem AD, Workgroup computers and more ( MAC and UNIX )
– Central Auditing
– Event Forwarding
– Inventory Reporting
– Windows Service Stale Credentials Notifications ( ideal for domain joined Windows Servers )
– More …
https://www.synergix.com/products/secrets-vault
https://www.synergix.com/knowledge-base/laps-for-azure
Hi Ken
This is really a great solution, and we will pilot this in out modern workplace project. Do you have some details about the Windows Rotation Service how to compile and how to install?
Thank you,
Mario